Rival Command
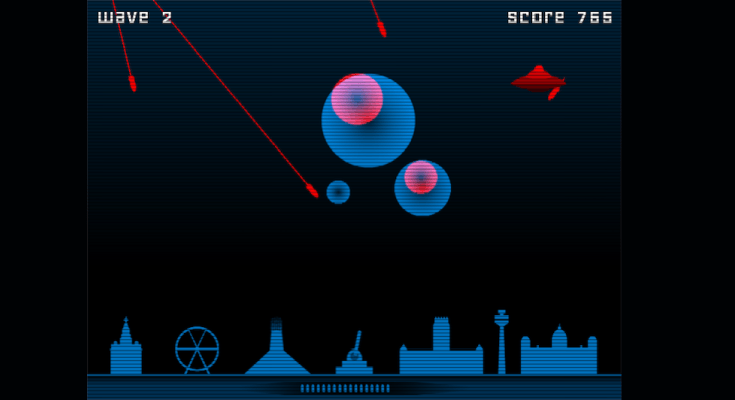
We launched a web browser game this week and dubbed it Rival Command, a take on the classic Missile Command, only with a Liverpool skyline and a couple of local footy teams to boot (painful). Anyway, I thought I’d write a little jolly on the experience and potentially help any developer readers with a few tips.
Phaser.js
For those who haven’t heard of Phaser.js, it’s an open source Javascript framework for creating browser games using HTML5 Canvas and WebGL technologies. Although the initial commit by Phaser’s founder, Richard Davey, clocked in just over three years ago on 12th April 2013, the framework has pushed its nose out in front of competitor libraries such as Pixi.js and Kiwi.js. As of today, Phaser has 4,423 code commits and over 200 contributors.
I first grabbed a copy of Phaser.js about a month ago and I was hooked. Having recently spent a lot of time with powerhouse game engine Unity, there’s a sense of liberation in the immediacy of Phaser’s workflow.
For those yet to dip their toe in the water, here are our favourite aspects of Phaser to convince you to give it a whirl:
- Incredible documentation and one of the most exhaustive example collection I’ve seen—for any software library.
- Single interface for both Canvas and WebGL rendering engines.
- Multiple physics engines: Arcade, Ninja, and P2 for requirements/performance tradeoffs.
- Quality code structure that makes sense straight from the off.
Typescript
Phaser comes with a Typescript declaration file, phaser.d.ts, so you’d be daft not to use Typescript. Here’s our simple Game class in both Typescript and its compiled Javascript counterpart.
module SC {

  export class Game extends Phaser.Game {

    events : SC.Events;
    playerState : SC.PlayerState;
    missileCollisionGroup : Phaser.Physics.P2.CollisionGroup;
    buildingCollisionGroup : Phaser.Physics.P2.CollisionGroup;
    audio : SC.Audio;

    constructor(config:Phaser.IGameConfig) {

        super(config);

        this.events = new Events();
        this.audio = new Audio(this);
        this.playerState = PlayerState.load();

        this.state.add('Boot', SC.Boot, false);
        this.state.add('Preloader', SC.Preloader, false);
        this.state.add('MainMenu', SC.MainMenu, false);
        this.state.add('Play', SC.Play, false);
        this.state.add('WaveComplete', SC.WaveComplete, false);
        this.state.add('Gameover', SC.GameOver, false);
        this.state.add('Register', SC.Register, false);
        this.state.add('Login', SC.Login, false);
        this.state.add('Leaderboard', SC.Leaderboard, false);

        this.state.start('Boot');
    }
}
Compiled Javascript
var __extends = (this && this.__extends) || function (d, b) {
    for (var p in b) if (b.hasOwnProperty(p)) d[p] = b[p];
    function __() { this.constructor = d; }
    d.prototype = b === null ? Object.create(b) : (__.prototype = b.prototype, new __());
};
var SC;
(function (SC) {
    var Game = (function (_super) {
        __extends(Game, _super);
        function Game(config) {
            _super.call(this, config);
            this.events = new SC.Events();
            this.audio = new SC.Audio(this);
            this.playerState = SC.PlayerState.load();
            this.state.add('Boot', SC.Boot, false);
            this.state.add('Preloader', SC.Preloader, false);
            this.state.add('MainMenu', SC.MainMenu, false);
            this.state.add('Play', SC.Play, false);
            this.state.add('WaveComplete', SC.WaveComplete, false);
            this.state.add('Gameover', SC.GameOver, false);
            this.state.add('Register', SC.Register, false);
            this.state.add('Login', SC.Login, false);
            this.state.add('Leaderboard', SC.Leaderboard, false);
            this.state.start('Boot');
        }
        return Game;
    }(Phaser.Game));
    SC.Game = Game;
})(SC || (SC = {}));
As you can see, Typescript is much cleaner and it’s less fatiguing during late-night code runs!
Let’s move on to how we deal with visuals.
Sprites
Phaser sprite (image object) management is a breeze. The following snippet shows how we load a spritesheet made with TexturePacker before adding a single image to the canvas.
// load spritesheet in to cache
game.load.atlasJSONHash('sprites', '/sprites.png', '/sprites.json');

// create sprite object and add it to the game stage
var gunBase = game.add.sprite(game.world.centerX, y, 'sprites', 'gun-base');

// tint the white sprite to the current user's team theme
gunBase.tint = game.playerState.getTeamColor();
Incidentally, here are the Liverpool landmark sprites used in the game (from left-to-right):
- Royal Liver Building
- Big Wheel
- Metropolitan Cathedral
- Anglican Cathedral
- Radio City Tower
- Port of Liverpool
![]()
Collisions
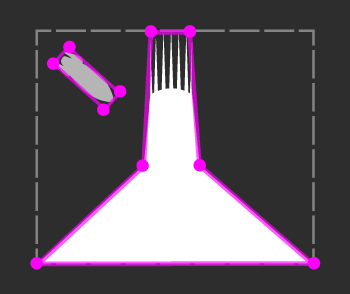
The irregular shapes of the landmarks meant that we couldn’t get away with simple rectangular collision bounds. So we enabled the more powerful P2 physics engine, created the polygon bounds in PhysicsEditor and setup the game objects as in the following snippet.
// Enable p2 physics for a landmark
game.physics.p2.enableBody(building, true);

// Get rid of current bounding box
building.body.clearShapes();

// Add our PhysicsEditor bounding shape
building.body.loadPolygon("sc-physics", "royal-liver-building");

// Configure collision groups i.e. what collides with what.
building.body.setCollisionGroup(this.game.buildingCollisionGroup);
building.body.collides(this.game.missileCollisionGroup);

// Missile
game.physics.p2.enable(missile);
missile.body.setCollisionGroup(game.missileCollisionGroup);
missile.body.collides(game.buildingCollisionGroup, this.missileHit, this);
The missileHit function then fires a Phaser Signal game event.
missileHit(missile, building)
{
    missile.kill();
    this.game.events.buildingHit.dispatch(building);
}
Several classes subscribe to the buildingHit event including the audio manager, the building explosion animator, and the game over logic.
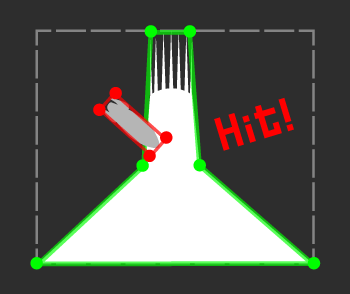
Here’s a little depiction of how the physics polygon bounds look for a missile-to-landmark collision.
Forms and Text Input
Phaser doesn’t have any built-in methods for handling text input with HTML forms, but it’s not hard to programatically add/remove input elements with a bit of style. The TextField class below is a crude Typescript implementation using standard DOM elements.
export class TextField {

    input : HTMLInputElement;

    valueChanged : Phaser.Signal;

    constructor (protected container:HTMLElement, attributes? : any, style : any = {}) {

        this.valueChanged = new Phaser.Signal();

        this.input = document.createElement("input");

        for (var key in attributes)
        {
            this.input.setAttribute(key, attributes[key]);
        }

        Phaser.Utils.extend(true, this.input.style, style);

        (function(self) {
            self.input.addEventListener('input', function(e:Event) {self.onInputChanged(e);}, false);
        })(this);

        container.appendChild(this.input);
    }

    onInputChanged(e:Event)
    {
        var value = (e.target).value;

        this.valueChanged.dispatch(value);
    }

    value()
    {
        return this.input.value;
    }

    remove()
    {
        this.container.removeChild(this.input);
    }
}

// Create a new email input element

var emailField = new TextField('#login-form',
    { name : "username", type : "email" },
    { top : "0", left: "0" });
One caveat you’ll need to be aware of is that these text fields won’t play ball with Phaser’s game scaling out-of-the-box. We set the game’s scale mode to Phaser.ScaleManager.RESIZE for our form screens.
Users and Leaderboards
Phaser is a frontend framework, so you have to use a third-party solution or roll your own server-side authentication and persistence layers like we did to manage users and their scores. Here are the components we chose:
- Web service: Laravel 5 PHP framework
- Authentication: OAuth 2.0 Laravel package
- Client store: HTML5 Local Storage
Analytics
Note, we've removed user id tracking to comply with EU GDPR laws, but we've kept it in the tutorial for completeness.
Implementing Google Analytics is a cinch. Here’s our analytics helper class:
export class Analytics {

    static setUser(userId:any)
    {
        ga('set', 'userId', userId);
    }

    static setScreen(screen:string)
    {
        ga('send', 'pageview', screen);
    }

    static auth(action:string, label?:string)
    {
        ga('send', {
            hitType: 'event',
            eventCategory: 'auth',
            eventAction: action,
            eventLabel: label
        });
    }

    static event(action:string, label?:string, value?:number)
    {
        ga('send', {
            hitType: 'event',
            eventCategory: 'game',
            eventAction: action,
            eventLabel: label,
            eventValue: value
        });
    }
}
Phaser’s Signals provide perfect hooks to fire analytic events. For example, our onGameOver analytics handler looks like this:
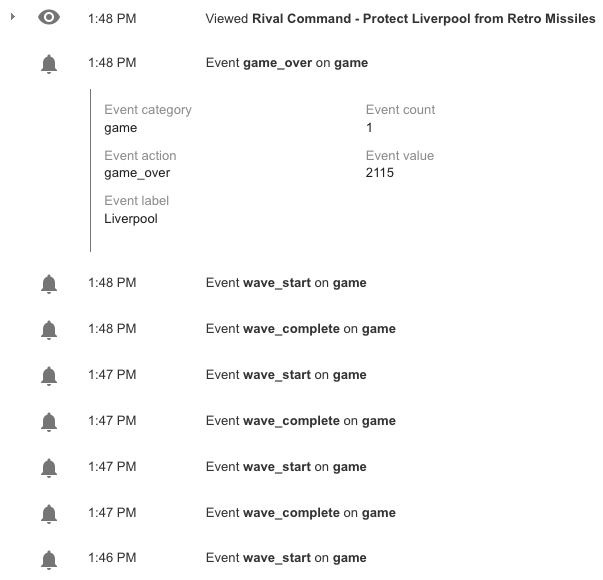
Analytics.event('game_over', game.playerState.team.name, game.playerState.score);
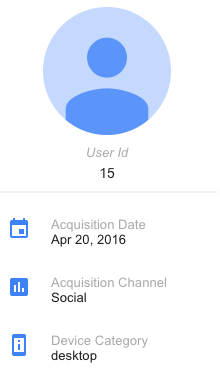
Make sure you enable the UserID feature on your Google Analytics property, especially given Google’s recent release of their User Explorer view. Just take a look at the screenshots for our user 15 below to give you an idea of what you can capture per user—pretty nifty, considering it’s a free service.
Game On
In short, Phaser’s a great game library for both beginners and seasoned developers. We thoroughly enjoyed working with it to produce Rival Command and we’re made up to see players coming back for another crack.
HAPPY CODING!